High-Resolution Images for UV DTF Transfer set the standard for sharp details on garments and accessories. A thoughtful approach to print size, detail, and color helps ensure results that look crisp from closer inspection to distant view. The foundation is accurate image resolution, careful file prep, and a workflow that preserves edge definition and texture. This guide focuses on practical steps you can apply today, whether you design a single piece or run batches. Key concepts include planning for output, choosing appropriate color space, and validating proofs before production.
In terms that complement the initial discussion and align with LSI principles, phrases like UV DTF transfer resolution and color management for UV DTF describe the same goal from different angles. Fabric-ready prints come from translating screen designs into production-ready artwork. Understanding UV DTF printer settings helps technicians dial in ink, heat, and substrate interactions for consistent results. The idea of high resolution UV prints underscores the aim of maintaining edge clarity across garment surfaces. By embracing these related terms, you can build a cohesive workflow that improves color fidelity, sharpness, and repeatability.
High-Resolution Images for UV DTF Transfer
High-Resolution Images for UV DTF Transfer set the baseline for crisp edges and faithful color on fabric. When planning for the final print size, think in terms of pixels per inch and choose a target PPI that preserves detail in the UV DTF transfer resolution. For small to mid-sized designs, 300 PPI is a common starting point; for very large designs, 180 to 300 PPI helps maintain perceived sharpness while avoiding oversized file sizes. This approach aligns with DTF transfer image optimization principles to ensure every detail prints cleanly.
Beyond pixels, successful UV DTF results depend on color management and proper file preparation. Soft proofing in the target color space and, if possible, running a test strip on the actual media helps ensure that High-Resolution Images for UV DTF Transfer retain edge definition, color depth, and texture when transferred to fabric. Keep master files lossless (TIFF or PNG) and embed color profiles to support consistent output across devices.
UV DTF Transfer Resolution and Final Print Size Planning
UV DTF transfer resolution needs to be matched to the final print size, so plan around the final dimensions and print distance. Calculate PPI at the intended size and choose a workflow that keeps sharp edges, while recognizing that UV DTF printer settings may differ by substrate and ink composition. The goal is consistent, high-quality results across runs.
Soft proofing with the target color space and, if possible, test prints on the actual media helps verify that the design holds up at larger scales. Keep a clear record of final dimensions, resolution, and any adjustments to ensure repeatable results across batches.
Color Management for UV DTF
Color management for UV DTF ensures that what you see on screen translates to the fabric accurately. Begin with a calibrated monitor and choose a consistent color space—many designers start in sRGB, but CMYK soft proofing or a printer-specific profile can reveal shifts before printing. This aligns with the broader strategy of color management for UV DTF and helps maintain color fidelity in high-resolution UV prints.
Implement a repeatable workflow: embed color profiles in all master files, use proofing workflows that simulate ink behavior on the transfer substrate, and maintain a color reference or grayscale chart in proofs. By controlling hue, saturation, and luminance, you protect the integrity of designs during UV DTF transfers.
Preparing Artwork for UV DTF Transfer
Preparation sets the stage for successful transfers. Measure the final print size in inches, translate to the target PPI (300 PPI is a strong default for UV DTF), and keep vector artwork for logos and type while preserving high-resolution raster images for photographic elements. Save masters in lossless formats such as TIFF or PNG and ensure the color profile is embedded to support downstream color management for UV DTF.
Graphics vs photos: Use vector artwork whenever possible; for photographic elements, maintain high resolution and be mindful of upscaling to avoid artifacts. When white areas exist, verify how white will render on the fabric after transfer. This step embodies DTF transfer image optimization by preserving edge definition and texture throughout the pipeline.
Upscaling, Sharpening, and Detail Retention for DTF Transfers
Upscaling is a practical tool when artwork is smaller than the final print size. Use trusted algorithms that preserve detail and minimize artifacts, then apply a light sharpening pass to counter perceived softness after transfer. The aim is natural, crisp edges that retain texture for high-quality UV prints and support the concept of High-Resolution Images for UV DTF Transfer.
Manage sharpening parameters with care: adjust radius based on the level of detail, avoid halos by moderate settings, and inspect edges at 100 percent magnification to ensure clean lines. This discipline helps prevent artifacts like jagged edges and texture loss that can undermine UV DTF transfer quality.
Practical UV DTF Printer Settings and Workflow
Understanding your printer’s output is essential. Collect manufacturer guidance for ink configurations, curing times, and heat settings, then build a preproduction checklist to standardize how files are prepared and printed across batches. This consistency is critical for maintaining High-Resolution Images for UV DTF Transfer in repeated runs and aligns with UV DTF transfer resolution considerations.
Run test prints on representative fabrics and transfer films to gauge color, sharpness, and fabric interaction. Manage layers carefully, ensure separate layers resolve cleanly on the transfer film, and adjust for substrate color differences. A robust workflow for UV DTF printer settings and transfer parameters minimizes surprises and supports reliable, scalable production.
Frequently Asked Questions
What defines High-Resolution Images for UV DTF Transfer and how does it relate to UV DTF transfer resolution?
High-Resolution Images for UV DTF Transfer describe images with sharp edges, good color depth, and clear detail when printed with UV DTF. For UV DTF transfer resolution, plan the final print size in inches and target a high value of pixels per inch (PPI). A safe starting point is 300 PPI for small to mid-sized designs, while very large designs may use 180–300 PPI depending on viewing distance. The goal is to preserve edge definition and texture so the print remains crisp after transfer.
How does DTF transfer image optimization contribute to high resolution UV prints?
DTF transfer image optimization involves preparing artwork with the right final size, using lossless formats (TIFF or PNG) with embedded color profiles, and keeping vector artwork for logos. For photos, retain high resolution and upscale carefully to avoid artifacts. Balance white and color so the transfer renders correctly on fabric. This optimization helps ensure High-Resolution Images for UV DTF Transfer look clean and faithful on the final product.
Which UV DTF printer settings are critical to preserving High-Resolution Images for UV DTF Transfer on fabric?
Key UV DTF printer settings include appropriate ink configurations, heat and cure settings, and considering substrate effects. Perform test prints at the intended final size, manage layer resolution to avoid interference between colors, and align transfer parameters with the fabric type. Documenting and repeating these settings ensures High-Resolution Images for UV DTF Transfer stay consistent across runs.
How can color management for UV DTF ensure consistent color for High-Resolution Images for UV DTF Transfer across screens and prints?
Color management for UV DTF involves choosing the right color space (screen work often uses sRGB, while proofs may use CMYK), soft proofing to predict printed results, and running test strips on actual media. Embed color profiles and reference scales (like grayscale) in proofs to compare against prints. Consistent color management helps High-Resolution Images for UV DTF Transfer look the same from screen to final fabric print.
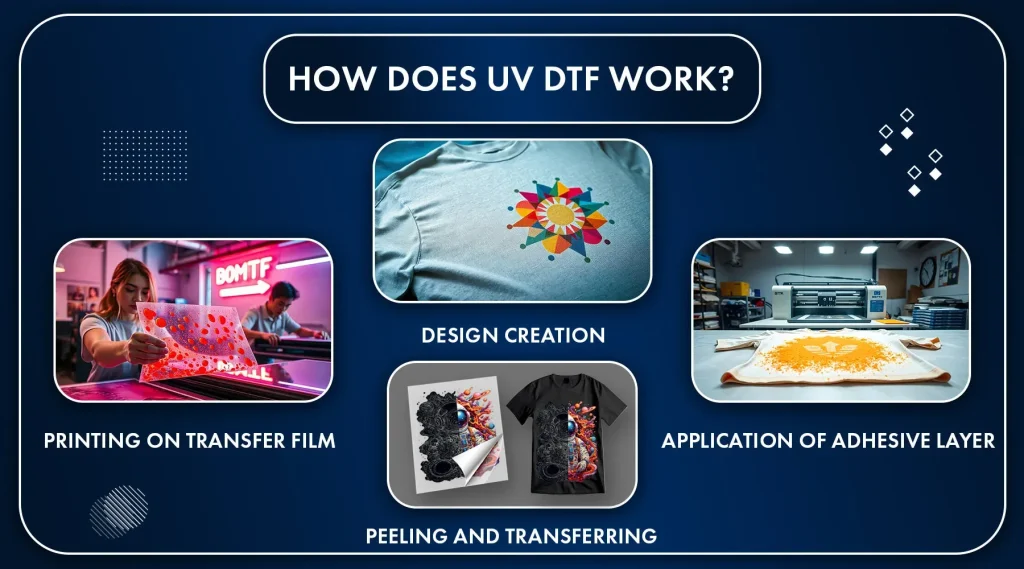
What is the step-by-step workflow from artwork to production to achieve High-Resolution Images for UV DTF Transfer?
Step 1: determine the final print size and target 300 PPI where feasible. Step 2: use vector elements for logos and high-res raster images for photos. Step 3: convert to the appropriate color space (sRGB for screen, CMYK if required by the lab). Step 4: upscale only as needed and apply careful sharpening. Step 5: soft proof and adjust. Step 6: save the master file and export the final print file in a lossless format accepted by the lab.
What common pitfalls should be avoided to maintain high-resolution UV prints for High-Resolution Images for UV DTF Transfer?
Avoid underestimating the required resolution for large prints, skipping color proofing, and over-sharpening which can create halos. Don’t ignore fabric texture effects, as weave and fiber content affect color saturation and edge clarity. Also ensure you aren’t printing on incompatible media and that all files use consistent color management and transfer parameters to maintain high-quality UV DTF results.
| Key Point | What to Do | Why It Matters |
|---|---|---|
| Final print size planning and PPI | Determine the final print size in inches and set a target PPI: typically 300 PPI for small–mid designs; 180–300 PPI for very large designs. | Ensures sharp edges and faithful reproduction after the UV DTF transfer. |
| Edge definition, color reproduction, and texture | Aim for crisp edges, vivid color, and faithful reproduction; preserve edge definition and texture across the design. | UV DTF transfers require clean edges and true color to look professional on fabric. |
| Color space and color management | Start with sRGB; soft proof in CMYK to predict how colors will appear after transfer; run a test strip; keep workflow color-consistent. | Predictable, repeatable colors from screen to print and reduce surprises in production. |
| Artwork preparation and file formats | Plan final size/resolution; save masters in lossless formats (TIFF or PNG); embed color profiles; use vector for logos and type when possible; retain high-resolution raster for photos. | Prevents compression artifacts and ensures compatibility with labs and printers. |
| Upscaling and sharpening | Upscale only when needed using trusted tools; apply light sharpening after upscaling to compensate for perceived softness. | Maintains natural, crisp edges and legibility of fine details without introducing artifacts. |
| Soft proofing and proofing workflow | Use soft proofing; compare screen preview to printed samples; adjust saturation, brightness, and contrast for the textile substrate; include a color reference or grayscale chart. | Helps anticipate how colors and tonal balance will look on fabric, reducing mis-match between screen and print. |
| Step-by-step production workflow | 1) Determine final size and target PPI; 2) Prepare vector elements and high-res raster; 3) Convert colors to the appropriate space; 4) Upscale only as needed and sharpen; 5) Soft proof and adjust; 6) Save master and export final lossless file. | Provides a reliable, end-to-end process that supports consistency across runs. |
| Printer settings and test prints | Follow manufacturer guidance; run small swatches at the intended size; manage layers; consider substrate effects; maintain batch consistency. | Helps verify color accuracy, sharpness, and transfer behavior before large production. |
| Common pitfalls | Avoid under-resolving large prints; always proof colors; don’t over-sharpen; account for fabric texture; ensure media compatibility. | Prevents quality drops and surprises in final output. |
| Quality checks before production | Confirm final dimensions/resolution; inspect edges; verify color balance against a proof; check file integrity and embedded profiles; run a fabric test. | Ensures results are consistent and print-ready before mass production. |
Summary
Conclusion