The DTF Gangsheet Builder is revolutionizing the way creators approach garment decoration through Direct to Film (DTF) printing. This innovative tool allows users to design and print multiple graphics on a single sheet, making it an efficient choice for both small businesses and hobbyists alike. Understanding how to use the DTF Gangsheet Builder can greatly enhance your ability to print clothes with DTF, ensuring that your designs are vibrant and high-quality. In this detailed guide, we will explore various DTF print techniques, providing you with a comprehensive DTF designs tutorial that will elevate your printing skills. From gathering materials to the final transfer process, mastering this technology will set you apart in the custom apparel industry.
Introducing the DTF Gangsheet Builder, an advanced solution for those seeking to master garment printing with Direct to Film technology. This multifunctional platform empowers users to create multiple designs simultaneously, streamlining the decoration process. Whether you’re learning how to utilize DTF for the first time or are polishing your existing skills, understanding the fundamentals of DTF printing is essential. Participants in the custom apparel market can benefit greatly from knowledge about these innovative DTF print techniques, allowing for the production of stunning outfits that truly reflect their creative visions. This guide will provide the necessary insights and strategies to efficiently harness the potential of the DTF Gangsheet Builder.
Understanding Direct to Film (DTF) Printing
Direct to Film (DTF) printing is revolutionizing how designs are transferred onto garments. Unlike traditional screen printing, DTF utilizes specialized films to print designs before transferring them onto fabrics. This method allows for a greater degree of color vibrancy and detail, making it ideal for intricate designs and multiple colors. DTF printing is especially beneficial for small businesses or individuals seeking quality prints without the need for large-scale equipment or setup. Key benefits include faster turnaround times and minimal setup, making it accessible for both beginners and seasoned professionals.
The DTF process involves a series of steps that combine digital technology with traditional printing techniques. After printing designs on a film, an adhesive layer is applied, which is then cured before being transferred to fabric. This multi-step approach ensures that designs not only look stunning but also withstand washing and wear. Understanding the intricacies of DTF printing is essential for anyone looking to venture into custom apparel creation, as it enhances both creativity and efficiency.
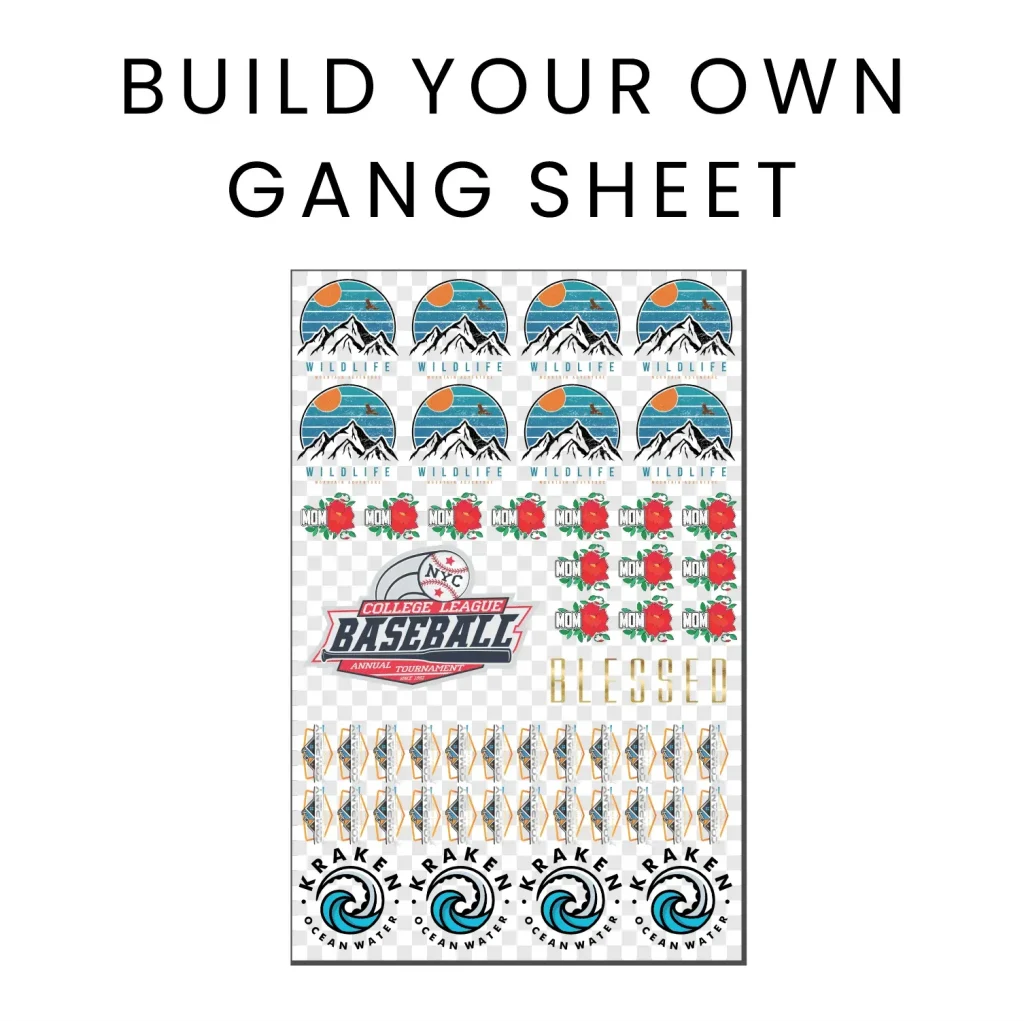
How to Use DTF Gangsheet Builder Effectively
Using the DTF Gangsheet Builder takes your DTF printing to the next level. This tool allows users to efficiently arrange multiple designs on a single film sheet, optimizing material usage while maintaining design clarity. Furthermore, it streamlines the printing process by minimizing the amount of film used, thus reducing costs in the long run. Mastering this tool is crucial for designers aiming to create stunning apparel designs without unnecessary waste.
To use the Gangsheet Builder effectively, start by uploading your designs into the software. The drag-and-drop feature makes arranging your graphics intuitive, allowing for quick adjustments to size and alignment. It’s important to maximize the space on the sheet to reduce costs while ensuring that each design retains its integrity during printing and application. Familiarity with the DTF Gangsheet Builder thus ensures that creators can produce high-quality prints efficiently.
Design Creation Tips for DTF Printing
When creating designs for DTF printing, the initial concept is key. Start with brainstorming ideas that resonate with your target audience and align with current trends. Use design software like Adobe Illustrator or CorelDRAW to create your digital artwork, making sure to save your files in high-resolution formats such as PNG or TIFF. These formats preserve the quality of your designs, crucial for producing vibrant prints.
Consider the fabrics you will print on while designing. Each material interacts differently with inks and adhesives, so tailor your designs accordingly. Bold colors and designs with contrast will often yield the best results, ensuring that your prints pop against the fabric background. Additionally, always keep in mind the transfer process; intricate designs can be stunning but may pose challenges during application.
The Printing Process: Key Considerations
The DTF printing process is where the magic happens, and it’s vital to understand the critical steps involved. Before initiating the printing command, make sure to adjust your printer settings according to the specific requirements of the DTF process. Factors such as printer type, ink compatibility, and film specifications all play a significant role in the final output. Improper settings can result in a loss of color accuracy or print quality.
Once your printer is set, execute the print command and observe the process closely. This is the moment when your designs transform from digital files into tangible prints on the film. Ensure that the print quality meets your expectations and that colors come through accurately, reflecting your original design intention. This step is foundational in producing high-quality apparel that showcases your artistic vision.
Applying Adhesive Powder: Techniques and Tips
After printing, applying adhesive powder correctly is paramount to achieving a successful transfer. Timing is crucial; apply the powder while the print is still warm to promote better adhesion. Utilize a steady hand when sprinkling the adhesive, ensuring that it covers the entire design evenly without clumping, which can interfere with the final look.
Once the adhesive is applied, remove any excess promptly. Shaking off the surplus powder helps to maintain a smooth texture on your final product. Proper adhesive application is essential not only for aesthetic purposes but also for the durability of the design after washing and wearing. Following these techniques will enhance the quality of your DTF prints.
Curing and Transferring Your DTF Prints
Curing your DTF prints is a critical step that cannot be overlooked. Using a heat press, apply the right amount of heat and pressure for the recommended duration to bond the adhesive to the ink. Each film may have specific curing guidelines, so consulting the manufacturer’s instructions is always a good practice. Proper curing allows for a more durable transfer and vibrant colors on your garments.
After curing, the final transfer to fabric is an exciting part of the DTF process. Ensure that the film is properly aligned on the fabric to maintain your design’s intended appearance. Once in position, apply firm pressure using the heat press, taking care to adhere to the recommended settings. This step is crucial for the longevity of your design, ensuring that it withstands multiple washes while retaining its original vibrancy.
Frequently Asked Questions
What is the DTF Gangsheet Builder and how does it simplify Direct to Film printing?
The DTF Gangsheet Builder is a specialized tool used in Direct to Film (DTF) printing that allows users to arrange multiple designs on a single sheet of film. This feature simplifies the printing process by maximizing the use of film, resulting in cost efficiency and reduced production time. Understanding how to use the DTF Gangsheet Builder effectively can significantly enhance your printing workflow.
How do I use the DTF Gangsheet Builder for creating designs?
Using the DTF Gangsheet Builder involves several steps: First, gather your designs created in software like Adobe Illustrator. Next, upload these designs into the Gangsheet Builder, ensuring optimal arrangement to utilize the film effectively. Adjust sizes and positions as necessary before proceeding to print. By mastering these steps, you can streamline your DTF printing process.
What materials do I need to start using the DTF Gangsheet Builder?
To begin using the DTF Gangsheet Builder, you’ll need quality DTF films, adhesive powder, a compatible DTF printer, and design software to create your graphics. Having the right materials ensures successful transfers and high-quality output when printing clothes with DTF techniques.
Can you provide a DTF designs tutorial for beginners using the Gangsheet Builder?
Certainly! A DTF designs tutorial for beginners starts with brainstorming ideas and sketching designs, followed by digitalizing them in design software. Once your graphics are ready, upload them to the DTF Gangsheet Builder, arrange them efficiently, and set your printer to the correct settings to print. This step-by-step approach ensures you create appealing designs while effectively using DTF techniques.
What printing techniques should I consider when working with DTF Gangsheet Builder?
When working with the DTF Gangsheet Builder, consider techniques such as precise alignment of designs to maximize film usage, selecting appropriate printer settings tailored for DTF, and applying adhesive powder immediately after printing for effective transfers. These techniques enhance the quality and durability of your prints, making the DTF process more efficient.
How does the DTF Gangsheet Builder contribute to printing clothes with DTF technology?
The DTF Gangsheet Builder greatly enhances the printing of clothes with DTF technology by allowing the simultaneous positioning of multiple designs, which saves both time and material costs. By understanding how to use this tool, you can produce high-quality, vibrant prints more efficiently, elevating your custom apparel offerings.
| Step | Description |
|---|---|
| 1: Gather Materials | Collect quality DTF films, adhesive powder, a DTF printer, and graphic design software. |
| 2: Design Creation | Brainstorm, sketch, and create digital designs tailored for your target audience. |
| 3: Utilizing the Gangsheet Builder | Upload designs and arrange them on the Gangsheet for optimal efficiency. |
| 4: Printing Process | Set printer settings correctly and execute the print command for high-quality output. |
| 5: Application of Adhesive | While warm, sprinkle adhesive powder on the print and shake off excess. |
| 6: Curing the Design | Use a heat press at the recommended temperature and duration for curing. |
| 7: Transfer to Fabric | Align the DTF film on the fabric and press with the heat press. |
Summary
DTF Gangsheet Builder enables you to elevate your design game to the next level through its user-friendly interface and efficient printing process. By mastering the steps outlined in this guide, you can seamlessly create eye-catching designs that stand out in the custom apparel market. From gathering materials to the final transfer application, each step is crucial in ensuring your designs not only look great but also adhere well to various fabrics. Engage with the DTF community and continuously refine your techniques to keep up with advancements in DTF technology. Unleash your creativity today with the DTF Gangsheet Builder and transform your vision into reality!